Jeep Wrangler 2018-2025 Owners Manual / GETTING TO KNOW YOUR VEHICLE / WRANGLER TOPS / Lowering The Soft Top Into Sunrider® Position / Remove The Right And Left Quarter Windows:
Jeep Wrangler: Lowering The Soft Top Into Sunrider® Position / Remove The Right And Left Quarter Windows:
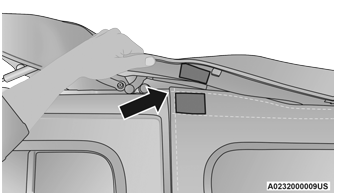
- Through the rear opening, push the bottom
corner outward and release tab from the
bottom of the window pillar.

Step One
- Undo the hook-and-loop fastener located at
the upper front corner of each quarter
window.
Step Two
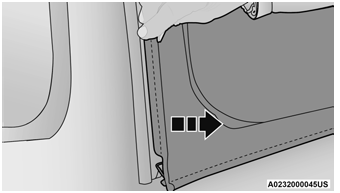
- Starting at the rear of the vehicle, remove
plastic retainer from along the bottom of the
window moving toward the front of the
vehicle.

Step Three
- Remove plastic retainer from the bottom to
the top of the front window.
Step Four
- While keeping the window level, slide
rearward until it is completely separate from
its retainer. Do not pull downward while
removing the window. Damage to the
retainer could result.

Step Five
- Store in soft window bag (if equipped) or a
safe location.
NOTE:
For information on the use of the storage bag, refer to the next section.
 Removing The Soft Top Windows
NOTE:
Before fully lowering the soft top, the rear
window and rear quarter windows must be
removed.
Remove The Rear Window:
With the swing gate open, remove the rear
window’s plastic retainers from the lower
right and left corners...
 Soft Top Window Storage Bag — If Equipped
To safely store the soft top rear window, and
rear quarter windows, proceed as follows:
NOTE:
The swing gate bar, once removed from the rear
window, does not store in the soft window
storage bag (if equipped)...
Other information:
Jeep Wrangler 2018-2025 Owners Manual: Uconnect Market
With Uconnect Market, you can enjoy seamless and secure transactions from the comfort of your vehicle. Make restaurant reservations, place food orders, or pay for other goods and services right from the vehicle’s touchscreen. To get started with Uconnect Market on the touchscreen: Press the Market button in the Uconnect App drawer...
Jeep Wrangler 2018-2025 Owners Manual: Door Frame Removal
NOTE: In four door models, the rear door frames must be removed first, followed by the front door frames. Using the provided #40 Torx head driver and ratchet, loosen the Torx screws located on the underside of each door frame (two per door)...
Categories
- Manuals Home
- Jeep Wrangler Owners Manual
- Jeep Wrangler Service Manual
- 3.6L Gasoline Engine
- Display Warnings And Maintenance
- 2.0L Engine and 3.6L Engine
- New on site
- Most important about car
Erasing All The HomeLink® Channels
To erase the channels, follow this procedure:
Place the ignition switch into the ON/RUN position. Push and hold the two outside HomeLink® buttons (I and III) for up to 20 seconds, or until the HomeLink® indicator light flashes.NOTE:
Erasing all channels should only be performed when programming HomeLink® for the first time. Do not erase channels when programming additional buttons.
Copyright © 2025 www.jewrangler.com